So, after I'd combed the fiber from my fleece, I had a mountain of small balls of fiber.

I didn't want to try to dye it like this - I was worried that the fibers on the inside wouldn't get enough color. So first, I re-rolled all of these in to big circular skeins of fiber (I wrapped them around my arm...) and tied them very loosely with cotton yarn.

This produced a very different looking mountain of fiber. This is what I proceeded to dye. :)
Materials
- Wilton's dyes in the desired colors
- Vinegar
- Undyed wool fiber...or fiber to be dyed over...
- Pot
- Dish
- Drying rack
- Measuring cup
- Skewer
- Spoon(s)
- Teaspoon and tablespoon measures in various sizes
- Candy thermometer
- Food scale
- Glass jars
- Colander
- Towel
- Dish rag
Step 1: Soak the fiber
To begin with, I weighed out my bundles of fiber on my scale. I aimed for between 3.5 ounces and 4 ounces for each dye batch.

Then, I soaked the fiber in water.

Soak the fiber you intend to dye for at least 30 minutes. When you've got everything else ready to go, drain the water and squeeze out the excess before adding your fiber to the dye bath.

Step 2: Prepare the dye
I prepared my dyes while the fiber was soaking. There are a lot of different ways and styles to apply dye to fiber. For this dye batch, I wanted my fiber to be rather randomly variegated, but with the same colors running throughout. As such, I prepared a bath of one color (recipes below!), and then prepared all of the other colors that I intended to use in jars.


When using Wilton's dyes, you have to mix them with water and vinegar. For each jar, I used 1 cup of water, 1 tablespoon of vinegar, and 1/8 teaspoon of dye. In my main bath, which was in the pot, I used 2 cups of water, 2 tablespoons of vinegar, and 1/8 teaspoon of dye.
I found that a good rule of thumb is to use around an eighth of a teaspoon of dye per ounce of fiber that you are dyeing. I wanted my colors to be pretty strong, so in general I erred on the side of using more than this. Furthermore, I had a wooden dowel thing (really a skewer, but that had one end thicker) as the handiest tool EVER. Not only did it give me a handy way to level off my teaspoons without getting dye all over anything, but then it also made a really good mixing tool - ensuring that I wasted almost none of my dye. :)
Step 3: Dye the fiber
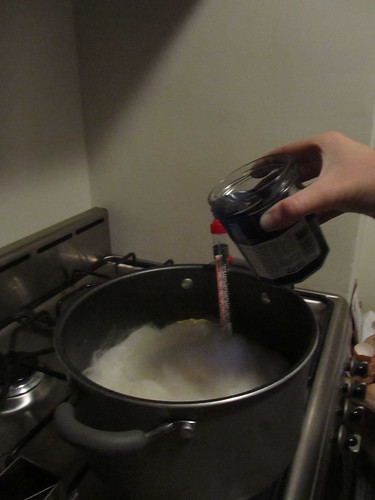
The pot when on the stove with a candy thermometer in the liquid at the bottom; goal was not to allow the temperature to go over 175 degrees. In practice, I found my temps varied between 150 and 200 degrees. Obviously, letting it get too high is bad - if the water boils, the fiber will felt because of the agitation and such. So don't let it boil! I generally checked on it every five to ten minutes while it was over heat, and I heated it for roughly 45 minutes. I added the fiber immediately, and it took 15 minutes for the liquid to get up to temperature, and another 30 minutes at that temperature.
As soon as I added the fiber, I poured the jars of dye over the top artistically - I wasn't going for striping or anything, so I just applied the dye willy-nilly. I then added an additional jar of hot tap water for each jar that I added of dye (so, if I added three jars of dye like in the picture, I added three cups of tap water). This helped make sure that all of the dye was washed out of my jars and on to my fiber!
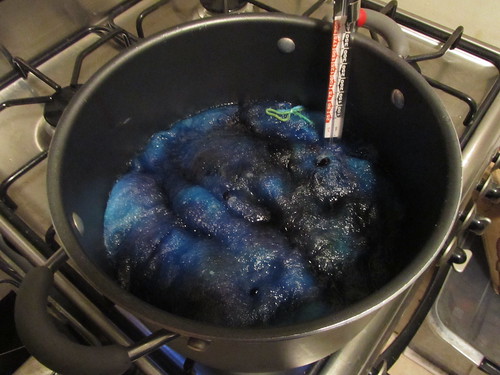
After pouring the dye on top of the fiber, I let it sit for a few minutes, and then I used a couple of spoons to flip the fiber over in the bath, thus ensuring that all the colors got mixed and all the fiber got exposed to the dyes.
Step 4: Dry the fiber
You're just about there! Soak the fiber in the hot water as long as you want, to make sure all the dye is soaked up. I generally checked on how much dye was still waiting to be absorbed with a regular spoon - I could see against the stainless steel how the water looked. Once I was satisfied, I poured the water and fiber through a colander, and rinsed the fiber in hot water. I squeezed out a bunch of the water with my hands (carefully, don't want to felt anything!) and then got the excess out using a towel.

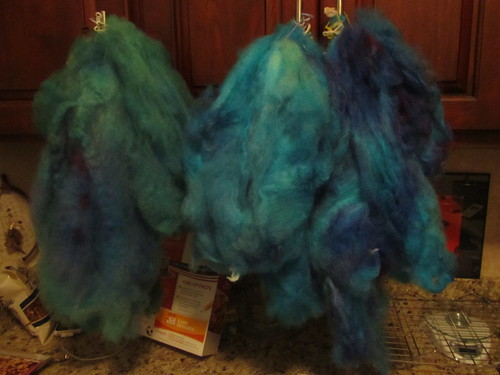
Then, hang the fiber somewhere it can dry. My apartment is tiny, so I hung it in the kitchen, from my cabinet knobs. :)
Step 5: Be in awe that you did that! Yes, you!
My goal with my project was to make 1 colorway from these bundles. Since I couldn't do them all in one dye lot, I decided I'd mix the fibers in spinning, and make each dye lot have just enough in common to have unifying colors, and just enough different to add some interest to my yarn. Here's each dye lot, and the colors that produced them! One thing you'll notice right away? Well, there's red in my fiber, and no read on the list! That's cause Wilton's dyes will break, and it's important to know that, and to have some ideas what colors will break how. For example, I wanted there to be some red and purple spots, so I deliberately added violet and black to some of my dye lots, cause I knew from reading around on the internet that Wilton's black would be absorbed in to the fiber in these shades. So do your homework! :)
Dye Lot 1:
2.7 ounces of fiber
1/8 tsp Royal Blue (in all of my dye lots, Royal Blue was the color I put in the pot; all the other colors were in jars that I poured over the fiber)
1/8 tsp Sky Blue
1/8 tsp Willow Green

This is the only dye lot I used green on, cause it ended up greener than I really wanted. :)
Dye Lot 2:
3.5 ounces of fiber
1/8 tsp Royal Blue
1/8 tsp Sky Blue
1/8 tsp Teal
1/8 tsp Cornflower Blue

Dye Lot 3:
3.4 ounces of fiber
1/8 tsp Royal Blue
1/8 tsp Sky Blue
1/8 tsp Cornflower Blue
1/8 tsp Violet

Dye Lot 4:
2.9 ounces of fiber
1/8 tsp Royal Blue
1/8 tsp Sky Blue
1/8 tsp Teal
1/8 tsp Black

Dye Lot 5:
4.0 ounces of fiber
1/8 tsp Royal Blue
1/8 tsp Sky Blue
1/8 tsp Teal
1/8 tsp Cornflower Blue
1/8 tsp Black
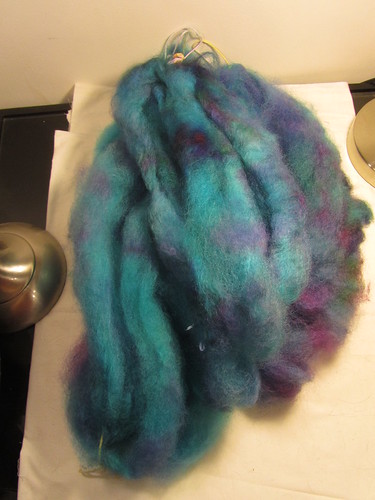
Over all, it's very hard to get the colors of this yarn to photograph true in my apartment - due to not very good lighting they all end up looking either too green or too blue (and not purple enough). However, here is a close up of the range of colors in the last dye lot:

Step 6: Spin, spin, spin!
If you want, your last step is to spin this lovely fiber that you've prepared!

Note that this is bluer than the fiber actually is - my lighting washes out the purple. However, what I did was break the dyed skeins back in to their original component balls, and then break those in to short segments, and while spinning, I alternated between those piles to mix up all the fiber together, all the while holding some Angelina in hand to mix in liberally. Here are a couple close ups!

(lighting option that makes it look more green...)
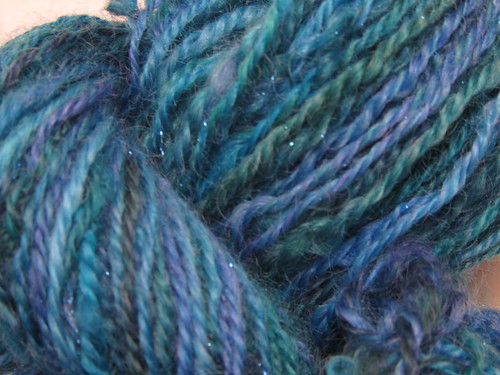
(lighting option that makes it look more blue...neither is quite right...)
I'm going to be doing more experimenting, and more meticulous note taking, and more posts like this, so stay tuned! :)
No comments:
Post a Comment