Today's finished object is...this blog. I've been thinking about it a lot, and I need to be reducing my commitments, and this blog has become increasingly superfluous as I have focused less and less on crafts as a business. I'm sure I'll still update from time to time, but not as a primary focus or as a frequent thing that I tell myself I "have" to do.
This comes out of a lot of life change in general. I've recently quit my job, and I'm thinking about moving, and traveling, and all manner of other things, and it's time for me to start clearing the decks.
It's been a pleasure getting to know you all! I'll still be active on Ravelry, and still be reachable here or through the CCC Facebook page, just not checking in as often. Have a great weekend, everyone!
Friday, September 21, 2012
Friday, August 31, 2012
Finished...Friday, 8/31/2012
I've been very "out of crafting" mode the last week or two. I think I really forced myself to the wall by pushing so hard to finish my blanket for the Ravellenic Games. However, tomorrow I'm leaving on a trip to Texas for a week, and I'm bringing cross stitch with me, so by next Wednesday I should have some progress to show. ;)
However, today something else is finished. I hope I can be forgiven for, unusually, posting a non-craft related thing in this blog. I do try to keep it on topic, but today is a big day for me - a big ending.
Today is my last day of work.
In 2003, I started working for my mother's small business doing part time work - primarily book keeping and data entry. By 2005, this was my primary source of income. By 2007, this was my full time and only job. But I've grown increasingly unhappy the last few years, and starting in June of 2011, I really hit the wall. I reached the point that every day was an effort. Every work activity I had to do was, "crap, I have to do that. :(" And finally, I accepted: it didn't matter if it was a "good" job, or any of the other justifications I had given myself. I shouldn't have to do a job that makes me miserable. I decided in February of this year that I would quit, and that today would be my last day. I've been counting down ever since. I informed my mother around February, and we as a company informed our clients in late July, and I've spent this month doing wrap up and organizing and all manner of other "omg we're almost done" kind of stuff.
And today is my last day.
This is the end of a big chapter of my life - a job I've had for 10 years - and I only have a few somewhat thought through ideas of what is coming next. All I know is...it's gonna be something new, and I'm totally freaked out about it. ;)
Until next week! Fiber Arts Friday; Finished Object Friday
Friday, August 24, 2012
Finished Object Friday, 8/24/2012
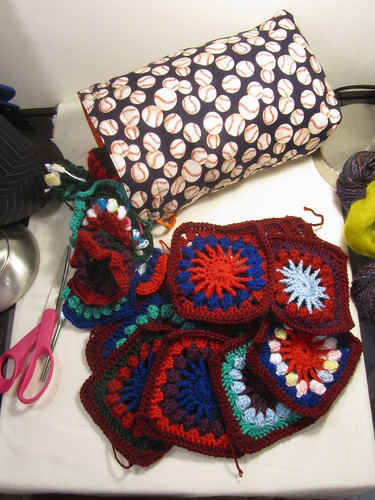
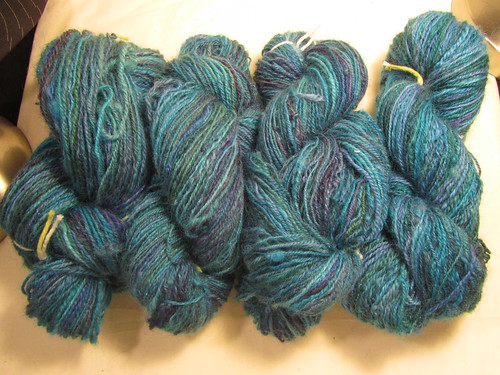
Well, I've had a very busy couple of weeks. Traveling! Getting sick! Quitting my job! It keeps a girl occupied! And has prevented me from posting. I've been fairly burned out on crafting the last week or two, and I'm certain it's a direct result of the push I made on my Ravellenic Games project. However, I DID finish it, last Saturday (as in, the Saturday still during the Olympics, not this most recently passed weekend) and now I finally have time to share it! I'm very, very proud of myself - I made 145 granny squares (I miscounted), sewed them all together, busted a whole bunch of stash, and FINISHED, all during the Olympics!! :)
And here it is!
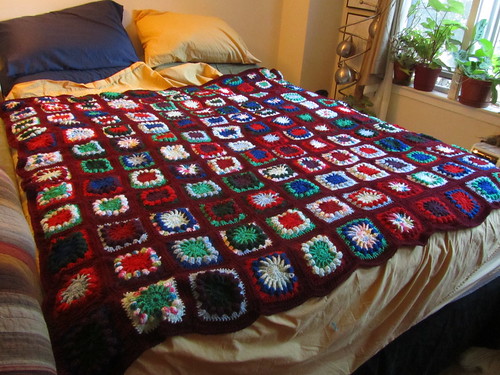
That's a Queen sized bed...
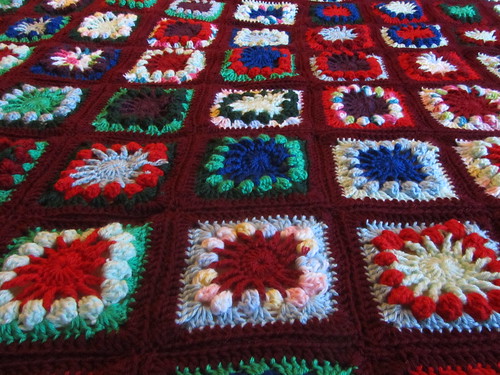
Close up!
Succeeding at this makes me want to tackle and finish a few of the other larger projects I've had lying around...like the quilt I started two years ago...or the costume stuff I've been toting around to make for 5 years...I have the feeling that with my soon-to-be-unemployed status, I'll be getting a LOT finished that I've been wanting to complete for a while...that's the hope, anyway! :)
See what everyone else has been making on Tami's Ami Blog and Wisdom Begins in Wonder!
And here it is!
That's a Queen sized bed...
Close up!
Succeeding at this makes me want to tackle and finish a few of the other larger projects I've had lying around...like the quilt I started two years ago...or the costume stuff I've been toting around to make for 5 years...I have the feeling that with my soon-to-be-unemployed status, I'll be getting a LOT finished that I've been wanting to complete for a while...that's the hope, anyway! :)
See what everyone else has been making on Tami's Ami Blog and Wisdom Begins in Wonder!
Friday, August 10, 2012
It's Friday But...
I'm pretty much just crocheting like a maniac. Nothing finished, nothing photographed...next week. Next week or bust... :)
Wednesday, August 8, 2012
Work in Progress Wednesday, 8/8/2012
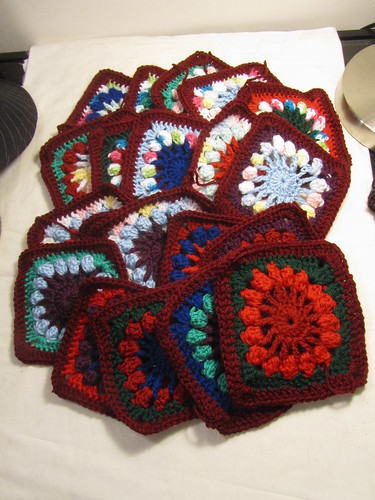
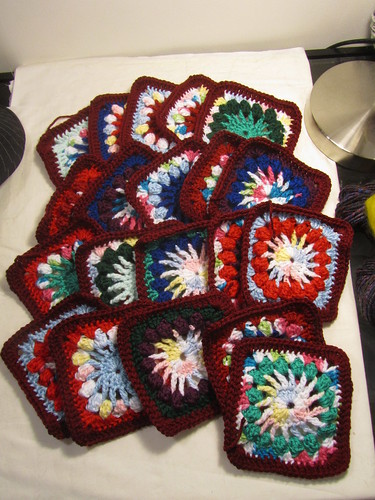
Well, I finished the first 71 (by accident) squares for my Granny Square blanket, and then started to sew them together, and very quickly realized that it wasn't going to be as big as I wanted, and I immediately launched in to making another 39 squares. Those are now more than half way done, but life is busy (between work, social life, and ALL OF THE CROCHET) and I'm not going to take the time to take new pictures. So instead, here are pictures of the first 71 squares! :)


The current plan is to finish these 39, then see where I am in terms of stash busting. I'm DETERMINED to use up these colors if I possibly can (at least one skein of each needs to be done, done, done). As such, I'll launch in to making more based on how much material is left. I'm currently thinking I'll just keep making squares til the main colors are gone. I want to keep joining them, but if I start running out of colors, and all of the existing squares are already joined, then the squares around the edges will be wonky because they'll all obviously be made with a different array of colors, whereas if I just mix them all together before sewing it won't show at all. This plan might mean that I won't be able to finish before the end of the Ravellenic games...but I'll know that I've at least tried my damnedest. :)
Check out what everyone else is making over on Work in Progress Wednesday!!!
Wednesday, August 1, 2012
Work in Progress Wednesday, 8/1/2012
It's the Ravellenic Games, and I've been working my tail off (or, really, working my hands sore) tackling what, for me, counts as an Olympic event: trying to finish an entire granny square afghan in two weeks. I started at around 5:30 PM on Friday, and have been working during nearly all of my spare minutes since then.
My project calls for 72 squares. I made six entire squares before switching to a production line model, and since then I've made all of the centers; yesterday night I finally got to adding the outer layer to all of my squares. So I now have 12 completely finished squares, and 64 to go...and then joining them...and then, if I have time, I'm going to make more squares to make the blanket bigger and to use up the stash yarn that I've been using for this. I want all of that yarn GONE. :)
And here they are...
Friday, July 27, 2012
Finished Object Friday, 7/27/2012
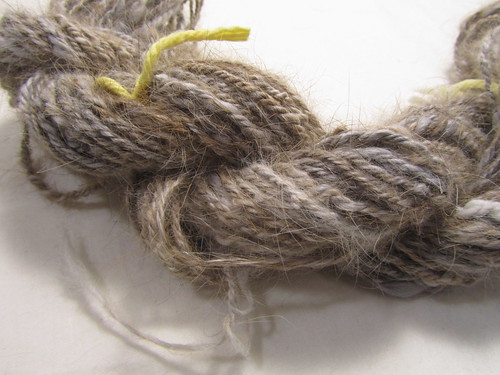
Well, it's been a bit! I've been working very early the last couple Fridays, with evening plans to boot, so I've missed some Fridays. Meanwhile, this Wednesday...I didn't HAVE any WIP - since I hadn't yet settled on my Ravellenic Games project - and therefore very little to say for myself. But now I'm finally around on Friday - if rather busy - and can quickly take a few minutes to show off the vast amount of spinning that I got done during Tour de Fleece!! :)
Angora!
I tried my hand at spinning angora for the first time!
1 ounce, Navajo plied, around 40 yards. :)
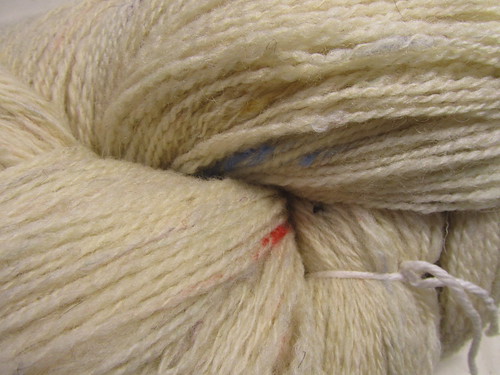
Silk!
While I was experimenting with fibers, I also took a stab at the silk cap that I had bought!

Also 1 ounce, also Navajo plied, but it's sooooo thin, I ended up with 110 yards!
Everything else I tackled was sheep-y. I did some "confetti" - boring old wool with bits of multi-colored yarn mixed in...
And I spun some lovely superfine merino that I had bought, the braid felt like a dream, and I tried my hand at fractal plying - no idea if it worked...
Of course, I did a bunch more of the spinning of the fiber that I prepped and dyed myself...
Finished the first pound!
All in all, I did about 2 pounds worth of spinning during Tour de Fleece. But man, I need a break! So it's time to drive myself insane crocheting for the Ravellenic Games. ;) Here's the whole TdF stash!!

You know you want to...check out Fiber Arts Friday and Finished Object Friday.
Angora!
I tried my hand at spinning angora for the first time!
1 ounce, Navajo plied, around 40 yards. :)
Silk!
While I was experimenting with fibers, I also took a stab at the silk cap that I had bought!
Also 1 ounce, also Navajo plied, but it's sooooo thin, I ended up with 110 yards!
Everything else I tackled was sheep-y. I did some "confetti" - boring old wool with bits of multi-colored yarn mixed in...
And I spun some lovely superfine merino that I had bought, the braid felt like a dream, and I tried my hand at fractal plying - no idea if it worked...
Of course, I did a bunch more of the spinning of the fiber that I prepped and dyed myself...
Finished the first pound!
All in all, I did about 2 pounds worth of spinning during Tour de Fleece. But man, I need a break! So it's time to drive myself insane crocheting for the Ravellenic Games. ;) Here's the whole TdF stash!!
You know you want to...check out Fiber Arts Friday and Finished Object Friday.
Wednesday, July 18, 2012
Work in Progress Wednesday, 7/18/2012
It's still all Tour de Fleece, all the time for me - all my crafting time is going to spinning. :)
On Monday night, I went to my first spin in in ages! The NYC Spinning Group met down by the Winter Garden, and I joined eight fellow spinners to sit in Battery Park and pull out our spindles. :) I finally made some progress on the ochre I've been spinning - I've been neglecting it intentionally so I can finish it in August for Nerd Wars Work in Progress challenge. :)
Then, last night I pulled out the silk I bought at Maryland Sheep and Wool. It's my first time spinning silk, and I found it pretty hard, but I solicited some tips from my TdF group (and now from ya'll!) so hopefully I'll have less trouble tonight. :)

The blue is another project, it'll be on Friday's post, though. ;)
Check out all the Works in Progress over on Tami's Amis!
On Monday night, I went to my first spin in in ages! The NYC Spinning Group met down by the Winter Garden, and I joined eight fellow spinners to sit in Battery Park and pull out our spindles. :) I finally made some progress on the ochre I've been spinning - I've been neglecting it intentionally so I can finish it in August for Nerd Wars Work in Progress challenge. :)
Then, last night I pulled out the silk I bought at Maryland Sheep and Wool. It's my first time spinning silk, and I found it pretty hard, but I solicited some tips from my TdF group (and now from ya'll!) so hopefully I'll have less trouble tonight. :)
The blue is another project, it'll be on Friday's post, though. ;)
Check out all the Works in Progress over on Tami's Amis!
Wednesday, July 11, 2012
Work in Progress Wednesday, 7/21/2012
Not much to say this week - it's all Tour de Fleece, all the time! Here's what I'm working on now:
 It's almost 4 ounces, I've got maybe half an ounce left of the first hank, then 4 more ounces after that, and I'll two ply it, should be fingering weight if I've gotten all my ducks in a row. ;)
Work in Progress Wednesday! Go over there! Check it out!
It's almost 4 ounces, I've got maybe half an ounce left of the first hank, then 4 more ounces after that, and I'll two ply it, should be fingering weight if I've gotten all my ducks in a row. ;)Work in Progress Wednesday! Go over there! Check it out!
Friday, July 6, 2012
Finished Object Friday, 7/6/2012
This week has been all about Tour de Fleece, and spinning my own dyed fiber! It's been pretty fun. I've rarely spun this much this quickly (though not never! ;) ).
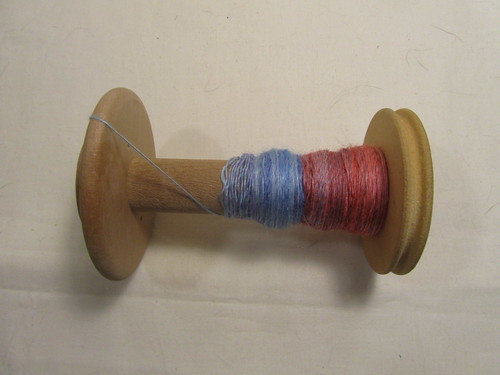
Right before TdF, I finished the second skein of yarn for my Nerd Wars dissertation. I posted a couple pics last week, I think, but now I've set it and dried it and all that jazz. :)

127 yards, exactly 4 ounces, roughly DK/Worsted weight.
Then, in May I tried Wilton's dyes for the first time. I posted a bunch of WIP pics of this on Wednesday, and now it's done! Turns out it's only 5.4 ounces - I had thought it was more. I wasn't too happy with the singles, or even how it looked while I was plying it, but once I got it off the niddy noddy and it was all dried, I'm actually thrilled with it. Funny how that goes...
400 yards, 5.4 ounces, fingering weight. Really very happy with it. I want to figure out what to make with it! :)
Check out what everyone else has done this past week at Wisdom Begins in Wonder and Tami's Amis.
Right before TdF, I finished the second skein of yarn for my Nerd Wars dissertation. I posted a couple pics last week, I think, but now I've set it and dried it and all that jazz. :)
127 yards, exactly 4 ounces, roughly DK/Worsted weight.
Then, in May I tried Wilton's dyes for the first time. I posted a bunch of WIP pics of this on Wednesday, and now it's done! Turns out it's only 5.4 ounces - I had thought it was more. I wasn't too happy with the singles, or even how it looked while I was plying it, but once I got it off the niddy noddy and it was all dried, I'm actually thrilled with it. Funny how that goes...
400 yards, 5.4 ounces, fingering weight. Really very happy with it. I want to figure out what to make with it! :)
Check out what everyone else has done this past week at Wisdom Begins in Wonder and Tami's Amis.
Wednesday, July 4, 2012
Work in Progress Wednesday, 7/4/2012
Happy Independence Day, to my fellow USA-ians! :) (and a belated Happy Canada day to my Canadian friends!)
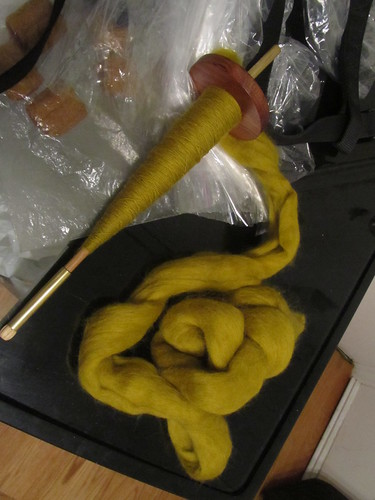
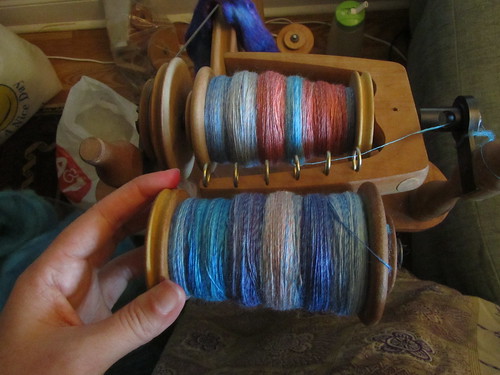
It's Tour de Fleece, which means my WIP is all about spinning, and probably will be for most of the next month. The current project is 6.7 ounces of (I think) Corriedale that I dyed myself in May. Various pictures!
The braid:

Day 1 of TdF:
Saturday, I was out virtually all day, so I did like 25 minutes of spinning in the morning and that was all...
Day 2 of TdF:
In contrast to Saturday, on Sunday I was spinning for like 6 hours. My hand was quite achy by the time I stopped! This was also when I realized just how patriotic-looking my choice of fiber was...

Day 3 of TdF:
Monday I didn't have loads of time, but I made decent progress.
Day 4 of TdF:
Finally, yesterday I got to start plying!

I expect to finish plying this skein today, before I head off to the fireworks. :)
Oh, and by the way? If you're curious about dyeing with Wilton's food coloring (like this skein!) you should take a peak at my post from Sunday. :) See what everyone else is up to over on Tamis Amis and Other Creations.
It's Tour de Fleece, which means my WIP is all about spinning, and probably will be for most of the next month. The current project is 6.7 ounces of (I think) Corriedale that I dyed myself in May. Various pictures!
The braid:
Day 1 of TdF:
Saturday, I was out virtually all day, so I did like 25 minutes of spinning in the morning and that was all...
Day 2 of TdF:
In contrast to Saturday, on Sunday I was spinning for like 6 hours. My hand was quite achy by the time I stopped! This was also when I realized just how patriotic-looking my choice of fiber was...
Day 3 of TdF:
Monday I didn't have loads of time, but I made decent progress.
Day 4 of TdF:
Finally, yesterday I got to start plying!
I expect to finish plying this skein today, before I head off to the fireworks. :)
Oh, and by the way? If you're curious about dyeing with Wilton's food coloring (like this skein!) you should take a peak at my post from Sunday. :) See what everyone else is up to over on Tamis Amis and Other Creations.
Sunday, July 1, 2012
Dying to Dye?
I'd wanted to try my hand at dyeing fiber, but I found it pretty intimidating to start with. It wasn't until May when I first made the plunge, doing one set of fiber with Kool Aid and another with Wilton's Icing gels. It turned out, it's a LOT of fun! But I've been able to find surprisingly few resources on recipes for colors (not that I've looked all that hard - certainly, What a Kool Way to Dye, the group on Ravelry, is a great starting point...). So, here's some specifics of how I went about dyeing with Wilton's. I'm not claiming this is the best way, or the only way, or even the right way...only that it's been working for me so far. :)
So, after I'd combed the fiber from my fleece, I had a mountain of small balls of fiber.

I didn't want to try to dye it like this - I was worried that the fibers on the inside wouldn't get enough color. So first, I re-rolled all of these in to big circular skeins of fiber (I wrapped them around my arm...) and tied them very loosely with cotton yarn.

This produced a very different looking mountain of fiber. This is what I proceeded to dye. :)
Materials
Step 1: Soak the fiber
To begin with, I weighed out my bundles of fiber on my scale. I aimed for between 3.5 ounces and 4 ounces for each dye batch.

Then, I soaked the fiber in water.
Soak the fiber you intend to dye for at least 30 minutes. When you've got everything else ready to go, drain the water and squeeze out the excess before adding your fiber to the dye bath.

Step 2: Prepare the dye
I prepared my dyes while the fiber was soaking. There are a lot of different ways and styles to apply dye to fiber. For this dye batch, I wanted my fiber to be rather randomly variegated, but with the same colors running throughout. As such, I prepared a bath of one color (recipes below!), and then prepared all of the other colors that I intended to use in jars.


When using Wilton's dyes, you have to mix them with water and vinegar. For each jar, I used 1 cup of water, 1 tablespoon of vinegar, and 1/8 teaspoon of dye. In my main bath, which was in the pot, I used 2 cups of water, 2 tablespoons of vinegar, and 1/8 teaspoon of dye.
I found that a good rule of thumb is to use around an eighth of a teaspoon of dye per ounce of fiber that you are dyeing. I wanted my colors to be pretty strong, so in general I erred on the side of using more than this. Furthermore, I had a wooden dowel thing (really a skewer, but that had one end thicker) as the handiest tool EVER. Not only did it give me a handy way to level off my teaspoons without getting dye all over anything, but then it also made a really good mixing tool - ensuring that I wasted almost none of my dye. :)
Step 3: Dye the fiber
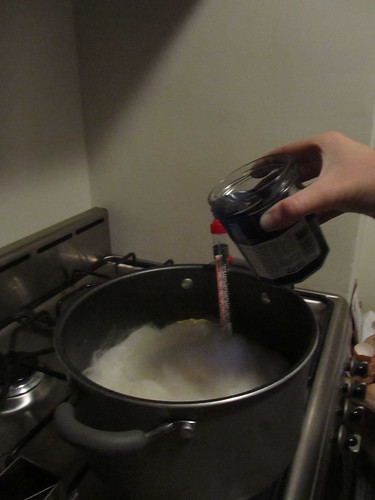
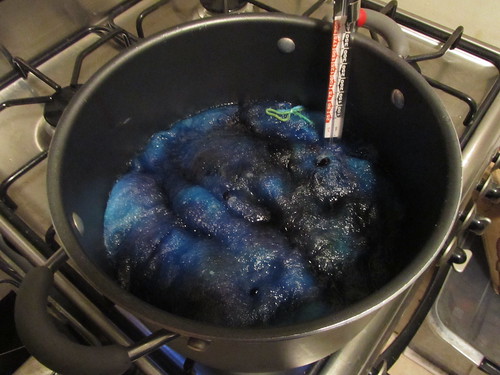
The pot when on the stove with a candy thermometer in the liquid at the bottom; goal was not to allow the temperature to go over 175 degrees. In practice, I found my temps varied between 150 and 200 degrees. Obviously, letting it get too high is bad - if the water boils, the fiber will felt because of the agitation and such. So don't let it boil! I generally checked on it every five to ten minutes while it was over heat, and I heated it for roughly 45 minutes. I added the fiber immediately, and it took 15 minutes for the liquid to get up to temperature, and another 30 minutes at that temperature.
As soon as I added the fiber, I poured the jars of dye over the top artistically - I wasn't going for striping or anything, so I just applied the dye willy-nilly. I then added an additional jar of hot tap water for each jar that I added of dye (so, if I added three jars of dye like in the picture, I added three cups of tap water). This helped make sure that all of the dye was washed out of my jars and on to my fiber!
After pouring the dye on top of the fiber, I let it sit for a few minutes, and then I used a couple of spoons to flip the fiber over in the bath, thus ensuring that all the colors got mixed and all the fiber got exposed to the dyes.
Step 4: Dry the fiber
You're just about there! Soak the fiber in the hot water as long as you want, to make sure all the dye is soaked up. I generally checked on how much dye was still waiting to be absorbed with a regular spoon - I could see against the stainless steel how the water looked. Once I was satisfied, I poured the water and fiber through a colander, and rinsed the fiber in hot water. I squeezed out a bunch of the water with my hands (carefully, don't want to felt anything!) and then got the excess out using a towel.

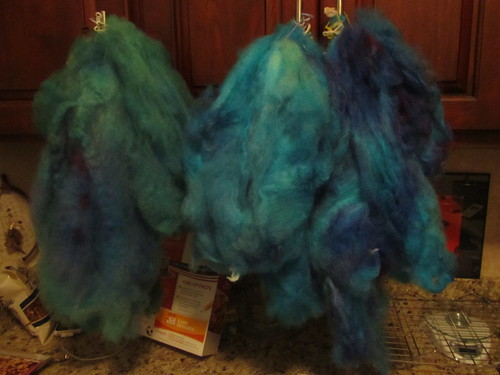
Then, hang the fiber somewhere it can dry. My apartment is tiny, so I hung it in the kitchen, from my cabinet knobs. :)
Step 5: Be in awe that you did that! Yes, you!
My goal with my project was to make 1 colorway from these bundles. Since I couldn't do them all in one dye lot, I decided I'd mix the fibers in spinning, and make each dye lot have just enough in common to have unifying colors, and just enough different to add some interest to my yarn. Here's each dye lot, and the colors that produced them! One thing you'll notice right away? Well, there's red in my fiber, and no read on the list! That's cause Wilton's dyes will break, and it's important to know that, and to have some ideas what colors will break how. For example, I wanted there to be some red and purple spots, so I deliberately added violet and black to some of my dye lots, cause I knew from reading around on the internet that Wilton's black would be absorbed in to the fiber in these shades. So do your homework! :)
Dye Lot 1:
2.7 ounces of fiber
1/8 tsp Royal Blue (in all of my dye lots, Royal Blue was the color I put in the pot; all the other colors were in jars that I poured over the fiber)
1/8 tsp Sky Blue
1/8 tsp Willow Green

This is the only dye lot I used green on, cause it ended up greener than I really wanted. :)
Dye Lot 2:
3.5 ounces of fiber
1/8 tsp Royal Blue
1/8 tsp Sky Blue
1/8 tsp Teal
1/8 tsp Cornflower Blue

Dye Lot 3:
3.4 ounces of fiber
1/8 tsp Royal Blue
1/8 tsp Sky Blue
1/8 tsp Cornflower Blue
1/8 tsp Violet

Dye Lot 4:
2.9 ounces of fiber
1/8 tsp Royal Blue
1/8 tsp Sky Blue
1/8 tsp Teal
1/8 tsp Black

Dye Lot 5:
4.0 ounces of fiber
1/8 tsp Royal Blue
1/8 tsp Sky Blue
1/8 tsp Teal
1/8 tsp Cornflower Blue
1/8 tsp Black
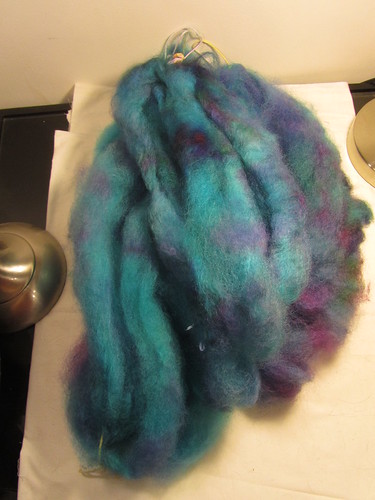
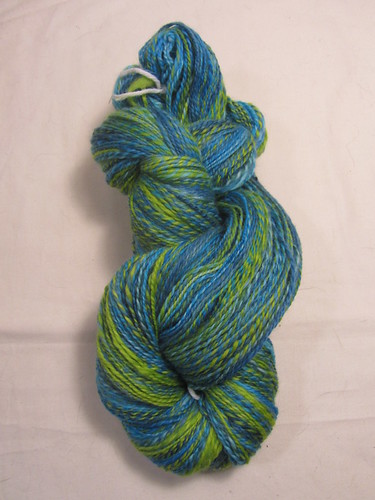
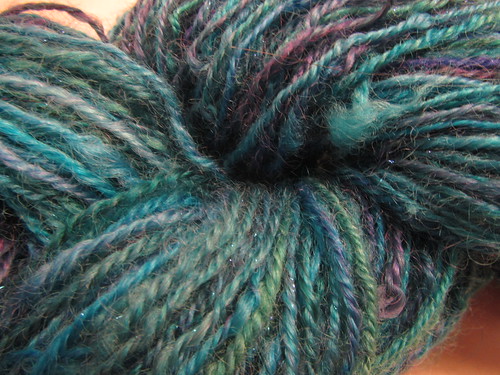
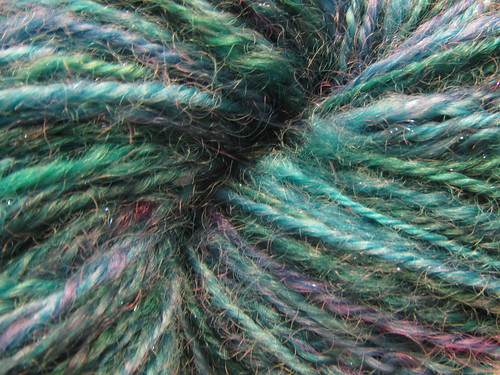
Over all, it's very hard to get the colors of this yarn to photograph true in my apartment - due to not very good lighting they all end up looking either too green or too blue (and not purple enough). However, here is a close up of the range of colors in the last dye lot:

Step 6: Spin, spin, spin!
If you want, your last step is to spin this lovely fiber that you've prepared!

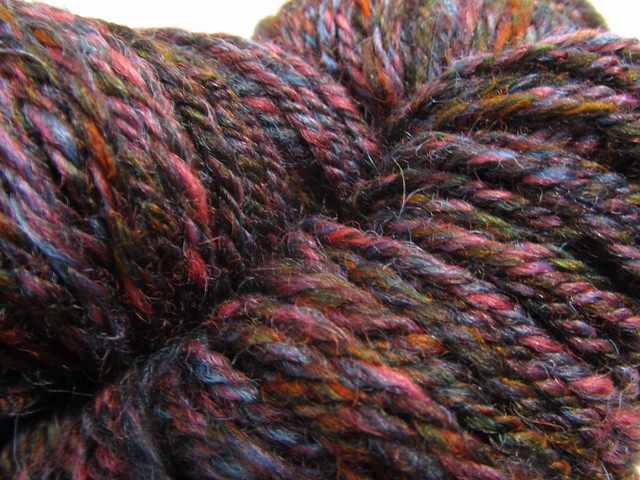
Note that this is bluer than the fiber actually is - my lighting washes out the purple. However, what I did was break the dyed skeins back in to their original component balls, and then break those in to short segments, and while spinning, I alternated between those piles to mix up all the fiber together, all the while holding some Angelina in hand to mix in liberally. Here are a couple close ups!

(lighting option that makes it look more green...)
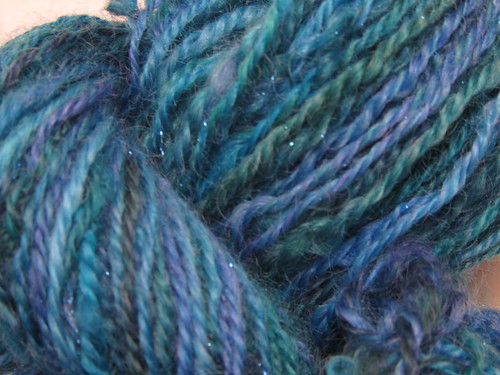
(lighting option that makes it look more blue...neither is quite right...)
I'm going to be doing more experimenting, and more meticulous note taking, and more posts like this, so stay tuned! :)
So, after I'd combed the fiber from my fleece, I had a mountain of small balls of fiber.
I didn't want to try to dye it like this - I was worried that the fibers on the inside wouldn't get enough color. So first, I re-rolled all of these in to big circular skeins of fiber (I wrapped them around my arm...) and tied them very loosely with cotton yarn.
This produced a very different looking mountain of fiber. This is what I proceeded to dye. :)
Materials
- Wilton's dyes in the desired colors
- Vinegar
- Undyed wool fiber...or fiber to be dyed over...
- Pot
- Dish
- Drying rack
- Measuring cup
- Skewer
- Spoon(s)
- Teaspoon and tablespoon measures in various sizes
- Candy thermometer
- Food scale
- Glass jars
- Colander
- Towel
- Dish rag
Step 1: Soak the fiber
To begin with, I weighed out my bundles of fiber on my scale. I aimed for between 3.5 ounces and 4 ounces for each dye batch.
Then, I soaked the fiber in water.
Soak the fiber you intend to dye for at least 30 minutes. When you've got everything else ready to go, drain the water and squeeze out the excess before adding your fiber to the dye bath.
Step 2: Prepare the dye
I prepared my dyes while the fiber was soaking. There are a lot of different ways and styles to apply dye to fiber. For this dye batch, I wanted my fiber to be rather randomly variegated, but with the same colors running throughout. As such, I prepared a bath of one color (recipes below!), and then prepared all of the other colors that I intended to use in jars.
When using Wilton's dyes, you have to mix them with water and vinegar. For each jar, I used 1 cup of water, 1 tablespoon of vinegar, and 1/8 teaspoon of dye. In my main bath, which was in the pot, I used 2 cups of water, 2 tablespoons of vinegar, and 1/8 teaspoon of dye.
I found that a good rule of thumb is to use around an eighth of a teaspoon of dye per ounce of fiber that you are dyeing. I wanted my colors to be pretty strong, so in general I erred on the side of using more than this. Furthermore, I had a wooden dowel thing (really a skewer, but that had one end thicker) as the handiest tool EVER. Not only did it give me a handy way to level off my teaspoons without getting dye all over anything, but then it also made a really good mixing tool - ensuring that I wasted almost none of my dye. :)
Step 3: Dye the fiber
The pot when on the stove with a candy thermometer in the liquid at the bottom; goal was not to allow the temperature to go over 175 degrees. In practice, I found my temps varied between 150 and 200 degrees. Obviously, letting it get too high is bad - if the water boils, the fiber will felt because of the agitation and such. So don't let it boil! I generally checked on it every five to ten minutes while it was over heat, and I heated it for roughly 45 minutes. I added the fiber immediately, and it took 15 minutes for the liquid to get up to temperature, and another 30 minutes at that temperature.
As soon as I added the fiber, I poured the jars of dye over the top artistically - I wasn't going for striping or anything, so I just applied the dye willy-nilly. I then added an additional jar of hot tap water for each jar that I added of dye (so, if I added three jars of dye like in the picture, I added three cups of tap water). This helped make sure that all of the dye was washed out of my jars and on to my fiber!
After pouring the dye on top of the fiber, I let it sit for a few minutes, and then I used a couple of spoons to flip the fiber over in the bath, thus ensuring that all the colors got mixed and all the fiber got exposed to the dyes.
Step 4: Dry the fiber
You're just about there! Soak the fiber in the hot water as long as you want, to make sure all the dye is soaked up. I generally checked on how much dye was still waiting to be absorbed with a regular spoon - I could see against the stainless steel how the water looked. Once I was satisfied, I poured the water and fiber through a colander, and rinsed the fiber in hot water. I squeezed out a bunch of the water with my hands (carefully, don't want to felt anything!) and then got the excess out using a towel.
Then, hang the fiber somewhere it can dry. My apartment is tiny, so I hung it in the kitchen, from my cabinet knobs. :)
Step 5: Be in awe that you did that! Yes, you!
My goal with my project was to make 1 colorway from these bundles. Since I couldn't do them all in one dye lot, I decided I'd mix the fibers in spinning, and make each dye lot have just enough in common to have unifying colors, and just enough different to add some interest to my yarn. Here's each dye lot, and the colors that produced them! One thing you'll notice right away? Well, there's red in my fiber, and no read on the list! That's cause Wilton's dyes will break, and it's important to know that, and to have some ideas what colors will break how. For example, I wanted there to be some red and purple spots, so I deliberately added violet and black to some of my dye lots, cause I knew from reading around on the internet that Wilton's black would be absorbed in to the fiber in these shades. So do your homework! :)
Dye Lot 1:
2.7 ounces of fiber
1/8 tsp Royal Blue (in all of my dye lots, Royal Blue was the color I put in the pot; all the other colors were in jars that I poured over the fiber)
1/8 tsp Sky Blue
1/8 tsp Willow Green
This is the only dye lot I used green on, cause it ended up greener than I really wanted. :)
Dye Lot 2:
3.5 ounces of fiber
1/8 tsp Royal Blue
1/8 tsp Sky Blue
1/8 tsp Teal
1/8 tsp Cornflower Blue
Dye Lot 3:
3.4 ounces of fiber
1/8 tsp Royal Blue
1/8 tsp Sky Blue
1/8 tsp Cornflower Blue
1/8 tsp Violet
Dye Lot 4:
2.9 ounces of fiber
1/8 tsp Royal Blue
1/8 tsp Sky Blue
1/8 tsp Teal
1/8 tsp Black
Dye Lot 5:
4.0 ounces of fiber
1/8 tsp Royal Blue
1/8 tsp Sky Blue
1/8 tsp Teal
1/8 tsp Cornflower Blue
1/8 tsp Black
Over all, it's very hard to get the colors of this yarn to photograph true in my apartment - due to not very good lighting they all end up looking either too green or too blue (and not purple enough). However, here is a close up of the range of colors in the last dye lot:
Step 6: Spin, spin, spin!
If you want, your last step is to spin this lovely fiber that you've prepared!
Note that this is bluer than the fiber actually is - my lighting washes out the purple. However, what I did was break the dyed skeins back in to their original component balls, and then break those in to short segments, and while spinning, I alternated between those piles to mix up all the fiber together, all the while holding some Angelina in hand to mix in liberally. Here are a couple close ups!
(lighting option that makes it look more green...)
(lighting option that makes it look more blue...neither is quite right...)
I'm going to be doing more experimenting, and more meticulous note taking, and more posts like this, so stay tuned! :)
Friday, June 29, 2012
Finished Fiber Arts Objects Friday, 6/29/2012
This week, I've been all kinds of all about spinning!
First, I finished all that rainbow and black spinning I've been doing!
Here's the last one, that I finished earlier this week:
Now I'm just working on picking out which skirt pattern I want to make. I don't actually have QUITE enough yarn (I ended up with about 550 yards of roughly worsted weight three ply) but I've got a couple other handspuns that I'm thinking about using as well (more next Wednesday).
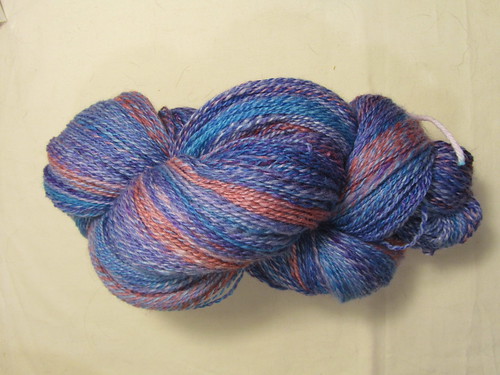
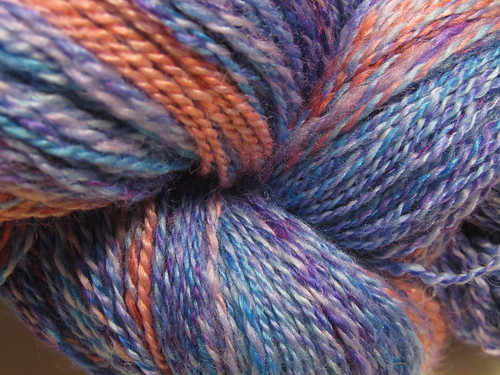
Then, I did my first skein of spinning of that yarn I dyed last week!
136 yards, Navajo-ply, 4.7 ounces, added loads of Angelina...only downside is that it's REALLY hard to get the colors to show true. So, it's actually more blue than this:
But, it's more purple/green than this:
More next week, cause I've got loads more of this stuff to spin! Also, check back on Sunday: I'll be doing an entire post on just how I did this dyeing and got these colors!
Check out Fiber Arts Friday and Finished Object Friday!
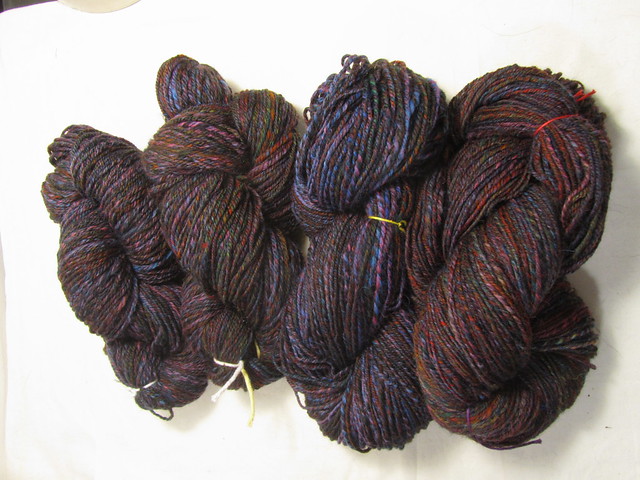
First, I finished all that rainbow and black spinning I've been doing!
Here's the last one, that I finished earlier this week:
Now I'm just working on picking out which skirt pattern I want to make. I don't actually have QUITE enough yarn (I ended up with about 550 yards of roughly worsted weight three ply) but I've got a couple other handspuns that I'm thinking about using as well (more next Wednesday).
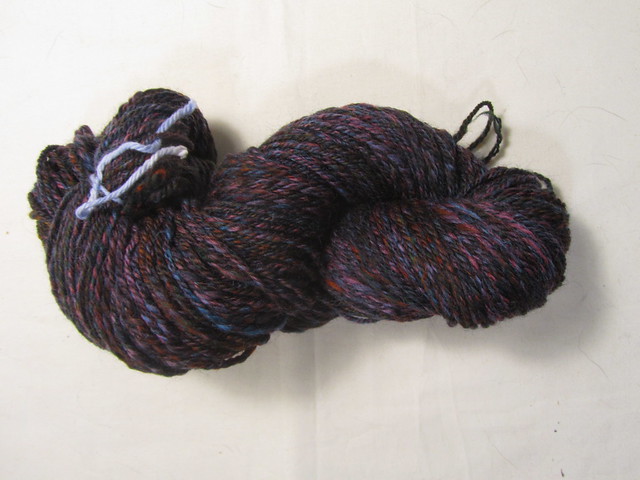
Then, I did my first skein of spinning of that yarn I dyed last week!
136 yards, Navajo-ply, 4.7 ounces, added loads of Angelina...only downside is that it's REALLY hard to get the colors to show true. So, it's actually more blue than this:
But, it's more purple/green than this:
More next week, cause I've got loads more of this stuff to spin! Also, check back on Sunday: I'll be doing an entire post on just how I did this dyeing and got these colors!
Check out Fiber Arts Friday and Finished Object Friday!
Subscribe to:
Posts (Atom)